Country-Specific Visa Information (4/14)
Planning to teach English in Korea? U.K. citizens require the E-2-1 visa to work in language academies. This guide covers everything you need, from preparing your documents to your arrival in Korea.
| If you are working with us, please send the original apostilles to us here:
Suite #402, Saimdang-ro 31-gil, Seocho-gu, Seoul, Republic of Korea (06650) (this should only be done after you have signed a contract through us) |
|
Note: Other E-2 visa types, such as E-2-2 (public school teaching assistants through EPIK) and E-2-91 (instructors hired under the FTA), are not covered here. |
What is an E-2-1 Visa?
The E-2-1 visa, also called the general “Foreign Language Instructor” visa, is the most common visa for native English speakers teaching conversational English in Korea. This visa lets you work at private language academies, language research institutes, and other equivalent educational organizations.
While international schools may hire on E-2 visas, positions are limited to teaching English. If you plan to teach other subjects, you will need an F-series resident visa.
E-2-1 (Foreign Language Instructor)
|
E-2-1 Eligibility Requirements:
- Be a citizen of a country where English is the primary language. (U.S.A., Canada, Australia, New Zealand, U.K. and Northern Ireland, Ireland, and South Africa)
- Hold at least a Bachelor’s degree from an accredited university in one of the 7 native English-speaking countries.
- Be a native speaker or have completed junior high school (7th grade) and lived for at least 10 years in a native English-speaking country
|
Special Exceptions:
|
Step 1. Visa Issuance Number (VIN) Application
To apply for an E-2-1 visa, you must first obtain a Visa Issuance Number (VIN). To get this number, you’ll need to prepare documents to send to your school. Your school will submit both your documents and its own to the Korean immigration office. Once the application is processed, you will receive your Confirmation of Visa Issuance Number (CVI No.) or simply a confirmation number, which you will use to apply for your visa at the Korean consulate in your country.
If you have a desired start date for teaching in Korea, begin preparing your visa documents 2 months in advance. Early preparation helps prevent last-minute issues for both you and your school.
We recommend arriving in March or September, as these are the busiest hiring periods when schools begin their spring and fall semesters. While teaching positions are available year-round, March and September offer the greatest number of job opportunities.
More details including pdfs of the documents listed below are available HERE.
|
For a March start:
|
1.1. - Required Documents for VIN:
| When to Prepare | Document(s) | Details |
| Before School Interview | (1) Apostilled National Criminal Record Check (DBS) |
• Must be issued within 6 months before the visa submission date. • Must be a clean criminal background check from the UK Home Office, which must also be apostilled. This check must be clear of any criminal convictions.
|
| Before School Interview |
• Must be issued within 6 months before the visa submission date. • Submit a notarized copy of your degree, NOT THE ORIGINAL (will not receive document back). • Attach a federal-level apostille • Additional degrees typically do not require notarization or apostille unless specifically requested. |
|
| Before School Interview | • Print the self-health statement and fill it out by hand. • Be honest, as you must complete a physical health exam in Korea within 15 days of your start date. • If you are taking medication, inform your recruiter/school, as it may affect your eligibility to work. • Exam includes drug screening tests (cocaine, opiates, cannabinoids, methoxyphenamine) | |
| After School Interview / Contract |
(1) Photocopy of Your Passport |
• Your passport must be valid for at least 6 months from your contract start date. (We recommend at least 13 months of validity to cover the full year.) • Information must be clear and readable |
| After School Interview/Contract |
(6) Official Passport-sized Photos |
• Photo size (3.5 x 4.5 cm). • Must be taken within the last 6 months • White background • No computer scans or color copies •Must prepare at least 6 photos in total for upcoming steps (We recommend at least 12 photos to cover other applications/uses in Korea.) |
| After School Interview/Contract |
(1) Visa Application Form |
• Fill out sections 1 – 7. • Please do not write your signature. |
| After School Interview/Contract | (1) Signed Employment Contract |
• Contract signed by YOU and the SCHOOL. • Must list the minimum wage for the relevant year (annual income amount). |
| After School Interview/Contract | (1) Copy of Your Resume |
• Submit the resume you had sent to your school. • List all relevant teaching and international experience, if applicable.fs |
1.2. - VIN Documents Procedure
1. Email Apostilled Document Photos for Review (Before School Interview)
Before mailing any physical documents, please send clear photos or scans of all your apostilled and notarized documents by email to Embark Recruiting for review. This step ensures we can check for any errors and prevent delays in your visa process. Also, let us know if you are taking any medication or have any physical or mental health conditions.
2. Mail Your Original Documents to Korea (After School Interview + Contract)
Once you have signed a work contract with the school, please send us all the documents via DHL Express.
Please email your recruiter the DHL tracking number so we can monitor the delivery status.
| Note: Using any shipping service other than DHL Express may cause delays in visa processing. |
3. School Submits Documents to Immigration or Korea Visa Portal
We will forward your documents to the school. The school will submit all paperwork, including their business license, school registration, and instructor operational plan, directly to the Korean Immigration Office or through the online Korea Visa Portal. Visa processing typically takes 7 to 10 working days after submission. (If additional documents or verification are needed during the review, processing may take longer.)
4. Receive Your Confirmation of Visa Issuance Number (CVI No.)
- Once your visa issuance number (VIN) is ready, Embark will notify you through the school and send you a “Receipt Number.” You must apply for your visa at your Korean embassy or consulate within 90 days of receiving your VIN.
- You can view your Confirmation of Visa Issuance Number (CVI No.) and print your Visa Issuance Certificate on the Korea Visa Portal.
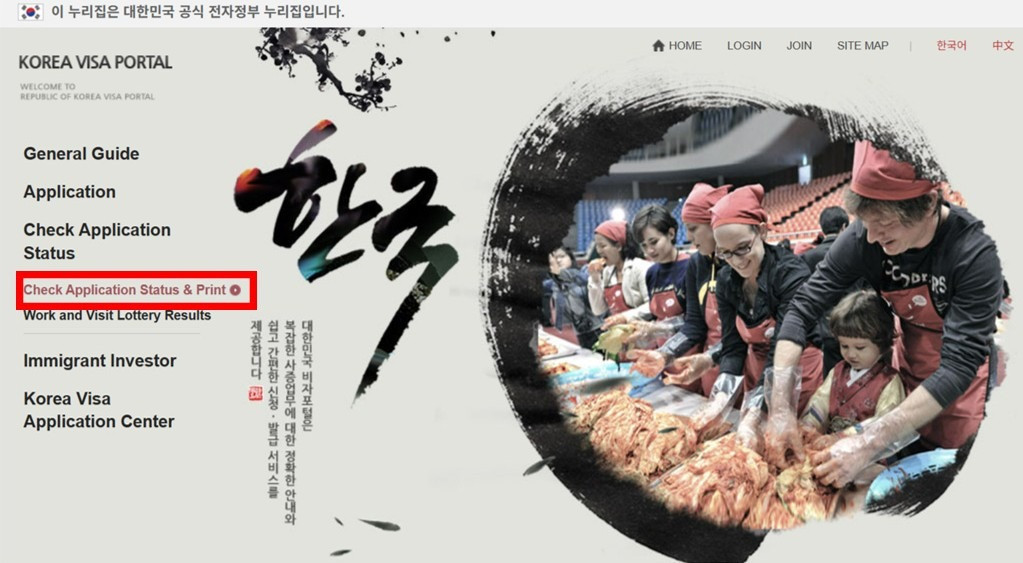
5. Navigate Korea Visa Portal
- Go to the Korea Visa Portal site. Click the language option in the top right and select English.
- On the left menu, hover over “Check Application Status” and click “Check Application Status & Print.”
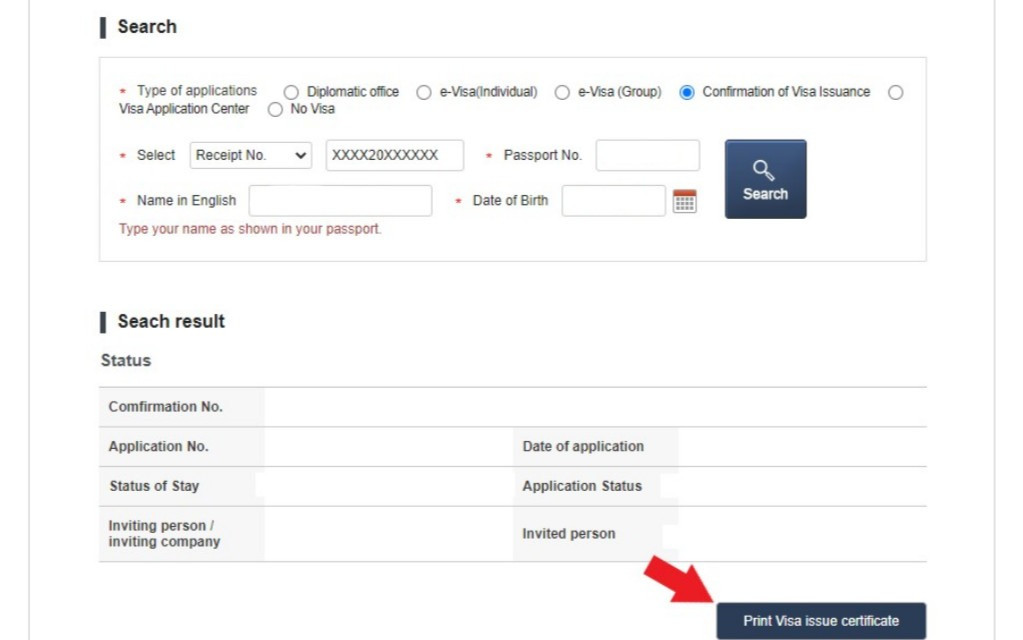
- You will be directed to a form page. For “Type of applications,” choose “Confirmation of Visa Issuance.” For “Select,” choose “Receipt No.” and enter the number we provided. Next, enter your passport number, your name in English (as it appears on your passport), and your date of birth.
- After clicking “Search,” you will see your application status, which includes your ”Confirmation Number.” This confirmation number is your CVI No., which you will need to proceed. You can also print your visa issuance certificate by clicking the button in the bottom right, "Print Visa issue certificate."
Step 2. E-2-1 Visa Application via Korea Visa Application Centre (KVAC)
After obtaining your Confirmation of Visa Issuance Number (CVI No.) or Confirmation Number, your next step is to submit your E-2-1 visa application by post to the Korea Visa Application Centre (KVAC) in London.
2.1 - Required Documents & Procedure for E-2-1 Visa Application
| Note: Visa processing times vary significantly by location and time of year.
Peak times tend to be around the Summer (Jun. - Aug.) and Winter (Dec. - Feb.) |
Total Fee: 255 EUR (as of 11th February 2026, fees tend to change every 6 months so we will try to keep updating accordingly)
- Service Fee (60 EUR)
- Visa Fee (180 EUR)
- (Optional ) Passport Return Fee/Postal Courier Fee (15 EUR)
*Please note that these fees reflect the cost for a British-passport holder. If you hold another citizenship, but are applying through KVAC, the fees will be different. See the attached list at the bottom of this post.
We strive to provide accurate and up-to-date information. However, we strongly recommend directly contacting the KVAC London branch for the most current guidance, assistance, and any updates or changes.
Below is the link to information about KVAC's documentation requirements. All the required documentation is attached at the bottom of the below post.
UK KVAC Visa Application Process
|
KVAC London Contact Information
|
2.2 - Check Visa Status & Print Grant Notice
Visit the Korea Visa Portal to check your application status. Once your visa is granted, you must print your Visa Grant Notice, which you’ll need when entering Korea.
1. Go to the Korea Visa Portal site. Click the language option in the top right and select English.
2. On the left menu, hover over “Check Application Status” and click “Check Application Status & Print.”
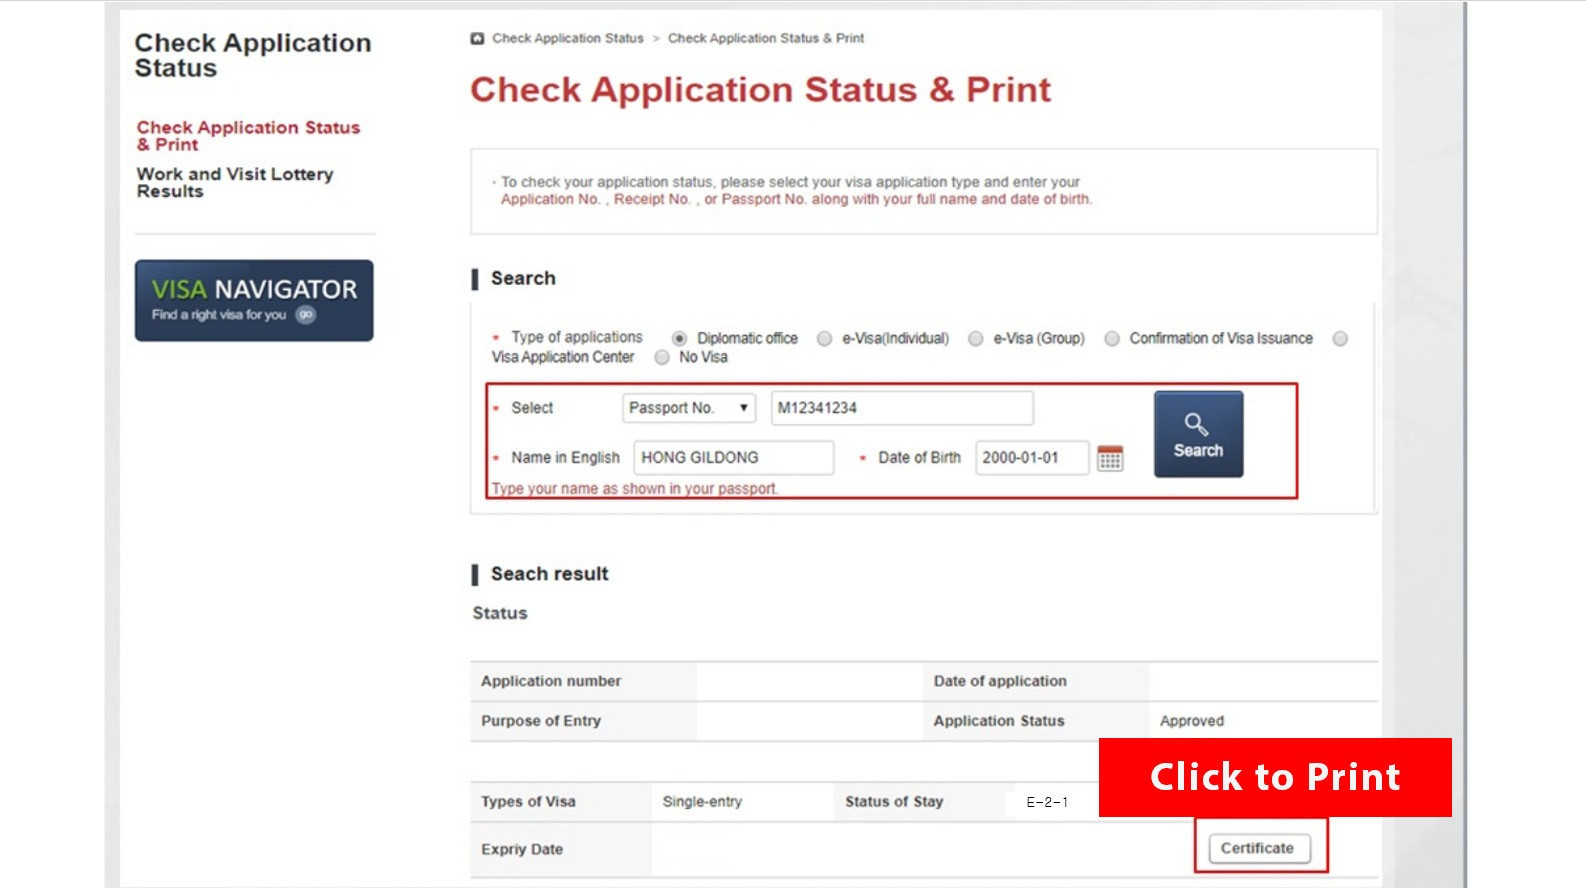
3. You will be redirected to a form page. For the Type of applications, choose “Diplomatic Office.” For Select, choose “Passport No.” and input your information. Enter your full name in English (as it appears in your passport) and your date of birth. After you fill out all required fields, click “Search.”
- You will be directed to a form page. For “Type of applications,” choose “Confirmation of Visa Issuance.” For “Select,” choose “Receipt No.” and enter the number we provided. Next, enter your passport number, your name in English (as shown in your passport), and your date of birth.
- After clicking “Search,” you will see your application status, which includes your ”Confirmation Number.” This confirmation number is your CVI No., which you will need to proceed. You can also print your visa issuance certificate by clicking the button in the bottom right.
4. On your search results, you will be able to view details, such as your application number, the date of submission, your visa type, the status of your application, your length of stay, and your visa’s expiration date.
5. A ”Certificate” button is located at the bottom right of the page. Click this button to download and print your Visa Grant Notice. You must bring the printed “Visa Grant Notice” with you when entering Korea.
Step 3. - Arrival in Korea & Visa Medical Examination
Congratulations, you are that much closer to beginning your teaching journey in Korea! After receiving your E-2-1 Visa, book your flight! Before your departure, take a moment to ensure you have all the documents for entry.
3.1 - Essential Documents for Entry
-
Passport
Ensure your passport is valid for at least 6 months. However, we strongly recommend that it remains valid for at least 13 months from the start of your contract, so you do not have to renew it during your first year in Korea.
-
E-2 Visa Grant Notice
Print a copy of your visa grant notice. You will be required to present this document when entering Korea.
-
Copy of Your School Contract and Contact Information
Carry a printed copy of your school contract and school contact details. This may be requested by immigration officials and/or needed in case you must contact your school upon arrival.
-
Carry 12 Extra Passport-Sized Photos
Bring 12 professional passport-sized photos (3.5 x 4.5cm.) These will be useful for various registrations after arrival, including your medical examination, residence card, and more.
3.2 - Book Appointments In Advance
To stay on schedule after arriving, we recommend booking all necessary appointments before you depart. Depending on your work starting date (must complete all within 15 days), you may have a tighter or more flexible timeline, but in all cases, you must prepare in advance.
Upon arrival, you will:
- Undergo a Visa Medical Examination at a designated Korean hospital.
- Apply for a Residence Card at your local Immigration Office, which serves as your official ID in Korea
- Obtain a Criminal Record Check & Report Employment to the Office of Education within 15 days of the starting work date.
Before You Depart
|
3.3 - Visa Medical Examination Process
Teachers must also register with their local Office of Education within 15 days of their start date. Before registering with the immigration office, all teachers must complete a “Medical Examination” (Health Check) at a hospital designated by the Ministry of Justice. We recommend booking your appointment in advance. Most hospitals allow you to make a reservation by filling out a form on their website or calling directly.
Note: Make sure to request 2 official copies of your Medical Examination Results:
|
Before Your Medical Exam
General Required Documents (check your specific hospital)
Health & Exam Guidelines
*The fee is typically paid by the teachers. Discuss with your school about payment/reimbursement.
Medical Examination
*Although HIV screening has not been mandatory since 2017, it is still commonly tested.
|
Step 4. Foreign Resident Registration & Residence Card (RC)
While immigration allows foreign teachers up to 90 days to complete their resident registration, in reality, teachers must begin the process immediately after receiving their medical examination results. This is because the local Office of Education requires teachers to register within 15 days of their contract starting date.
The registration process is necessary to obtain a Residence Card (RC), which serves as your official ID and is required for accessing most services in Korea, such as opening a bank account. To apply, teachers must visit the local immigration office that has jurisdiction over their area of residence (not workplace). For example, if your housing is in Seoul, you must register at the Seoul Immigration Office.
| Note: If you’re looking to travel outside of Korea, you must first apply for a re-entry permit and carry your RC with you. You are NOT permitted to leave the country before receiving your RC. If you are permanently leaving Korea, you must return your RC at the airport. |
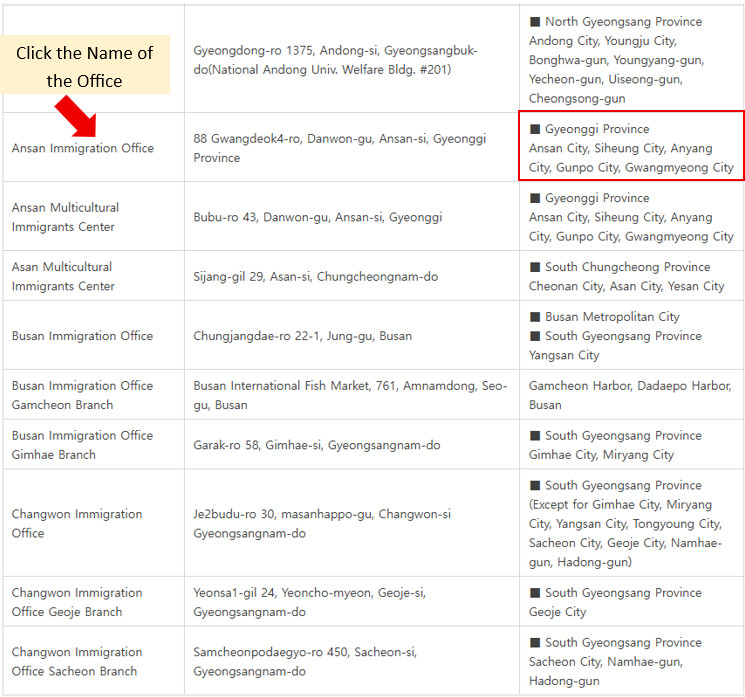
4.1 Find Your Immigration Office in Korea
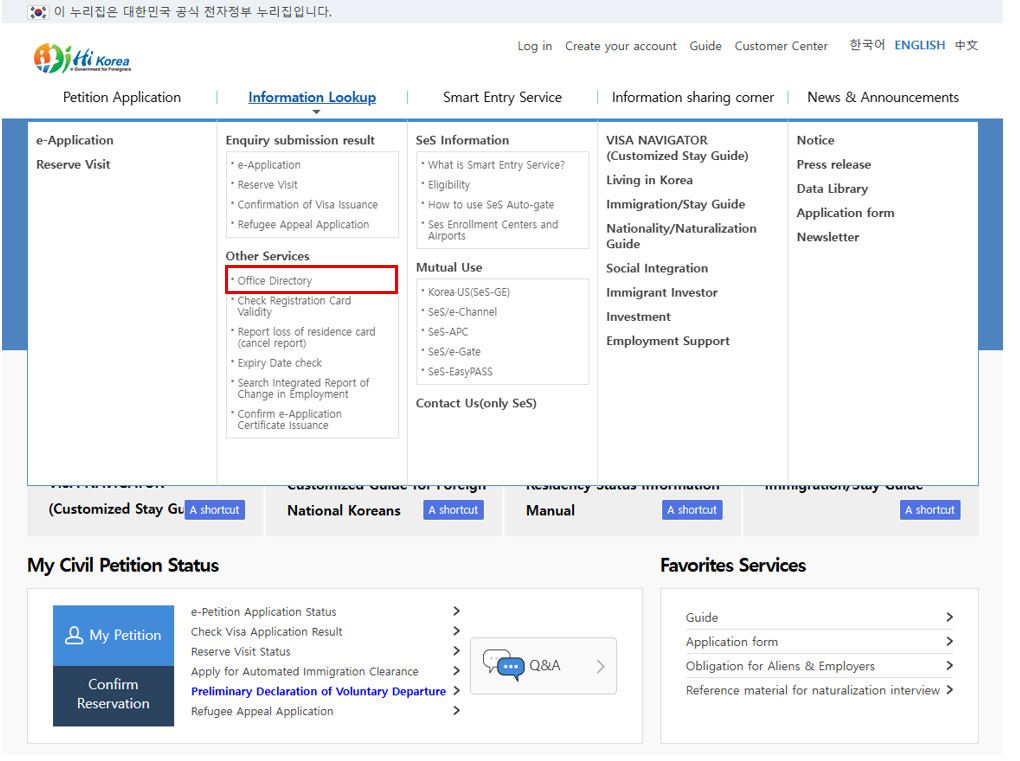
1. Navigate the Hi Korea Office Directory
- Visit the Hi Korea website (English version).
- Click the “Information Lookup” tab.
- Under the “Other Services" section, select "Office Directory.”

2. Search for Your Immigration Office
If you do not know the name of your immigration office, select your province, metropolitan city, or region in the "Category Area" (e.g., Seoul). Then check the jurisdiction area to see if your city or district (gu) is covered.
If you already know the name of your office, simply enter it in the “Organization Name” field and click "Search."
3. Find Your Immigration Office Quickly
- Use Ctrl+F (Windows) or Command+F (Mac) to quickly search for your city (시), county (군), or district (구). For example, search for “Siheung" if you live in Siheung (under jurisdiction of the Ansan Immigration Office).
-
Click the office name for more detailed information.
-
Take note of the Office Name, Address, and Phone Number.
4.2 Residence Card Application Procedure
Before you can receive your Residence Card (formerly ARC) and be officially registered as a foreign resident in Korea, you must schedule an appointment at your local Immigration Office. The Residence Card is essential; it serves as your legal ID in Korea and is required for tasks such as opening a bank account, signing a phone contract, accessing healthcare, and proving your visa status.
While immigration allows foreign teachers up to 90 days to complete their resident registration, in reality, teachers must begin the process immediately after receiving their medical examination results. This is because the local Office of Education requires teachers to register within 15 days of their contract starting date. To apply, teachers must visit the local immigration office that has jurisdiction over their area of residence (not workplace). For example, if your housing is in Seoul, you must register at the Seoul Immigration Office.
| Note: If you’re looking to travel outside of Korea, you must first apply for a re-entry permit and carry your RC with you. You are NOT permitted to leave the country before receiving your RC. If you are permanently leaving Korea, you must return your RC at the airport. |
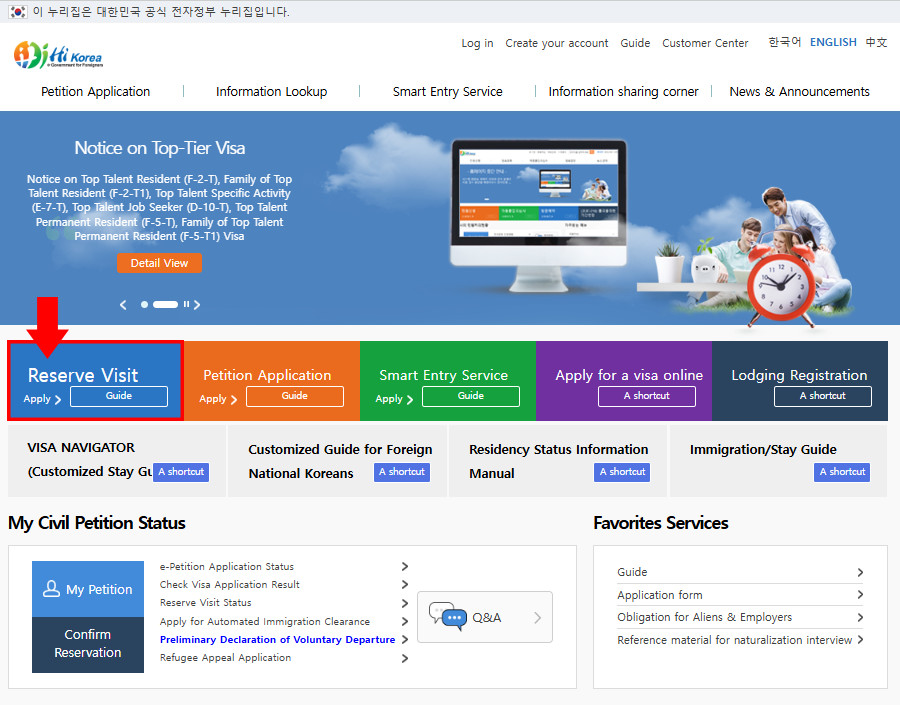
1. Make an Online Reservation through Hi Korea
You must make an appointment before visiting the Immigration Office. Walk-ins are only allowed on the last day of your visa, and even then, your application may not be accepted. See how to reserve an immigration appointment through Hi Korea.
2. Preparing Documents for Your Residence Card
Prepare Documents + Fee
Application Fee: Cash 35,000 KRW (39,000 KRW with mail delivery, since January 10, 2025)*
*The fee is typically paid by the teachers. Discuss with your school about payment/reimbursement. |
| Document(s) | Details |
|
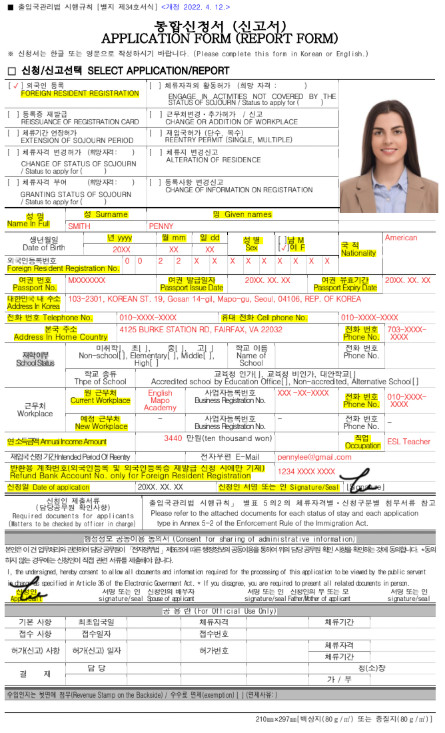
(1) Application Form (Report Form)
|
• Available in the immigration office, but you can bring a printed copy in advance
|
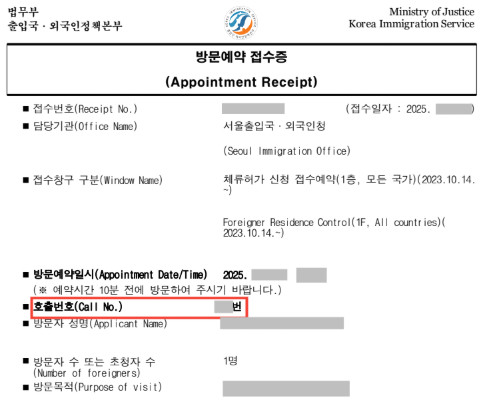
| (1) Appointment Receipt |
• Print out the appointment receipt from Hi Korea • Remember your Call Number (Call No.), this number will appear on the screen at the office. Go to the booth with that number when called.
|
| (1) Official Passport-sized Photo |
• 3.5 x 4.5 cm • Color, white background • Ears visible, no hats, closed mouth, etc. • Glue to the right side of the form |
| Original Passport | • Must have at least 6 months of validity. |
| (1) Photocopy of Passport | • Copy of the pages showing your personal information and visa. |
| (1) Visa Grant Notice | • Print Visa Grant Notice on “Korea Visa Portal.” |
| (1) Medical Examination Report | • Must include drug test results (cocaine, opiates, cannabinoids, methoxyphenamine) |
| Documents to Prove Place of Residence (See Proof of Residence) | • Lease Contract, Certificate of Accommodation, Advance Notice on Expiration of Stay, Utility Bill Payment Receipt, etc. (Provided by the school if you're in school housing.) |
| (1) Copy of the School's Business Registration & School Establishment Certificates | • These certificates are provided by the school. |
3. Visiting Your Local Immigration Office & Applying for Your Card (In-Person)
1. Plan to arrive at least 10 minutes BEFORE your appointment time, as you will have to pay for the Residence Card prior to submitting your documents.
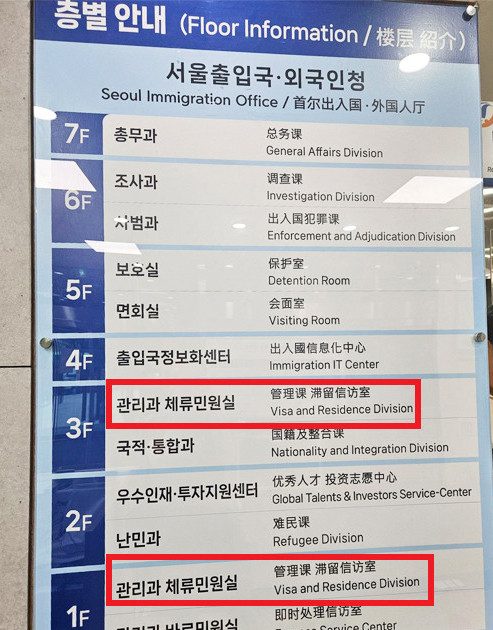
2. Locate the “Residence (Permits/Division/etc.) Floor in your local office (체류민원실 in Korean
(E.g., Located on 1F & 3F in Seoul Immigration Office)
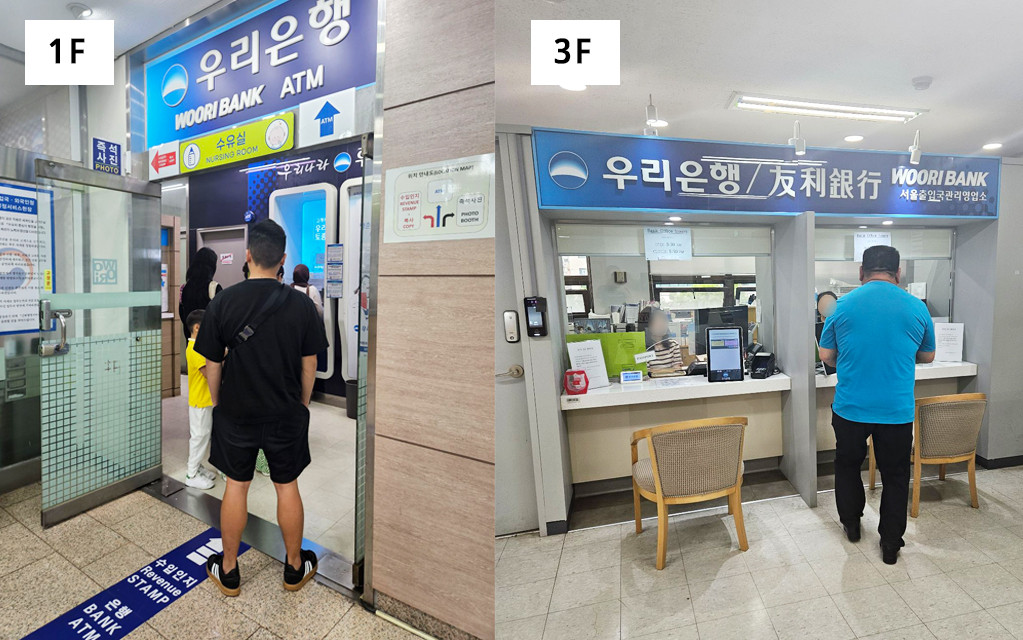
3. Before submitting your documents, you must pay your card issuance fee at the ATM inside the building.
| Note: Check whether another ATM has a shorter line. For example, at the Seoul Immigration Office, the Woori Bank ATM on the third floor is usually less crowded than the one on the first floor. |
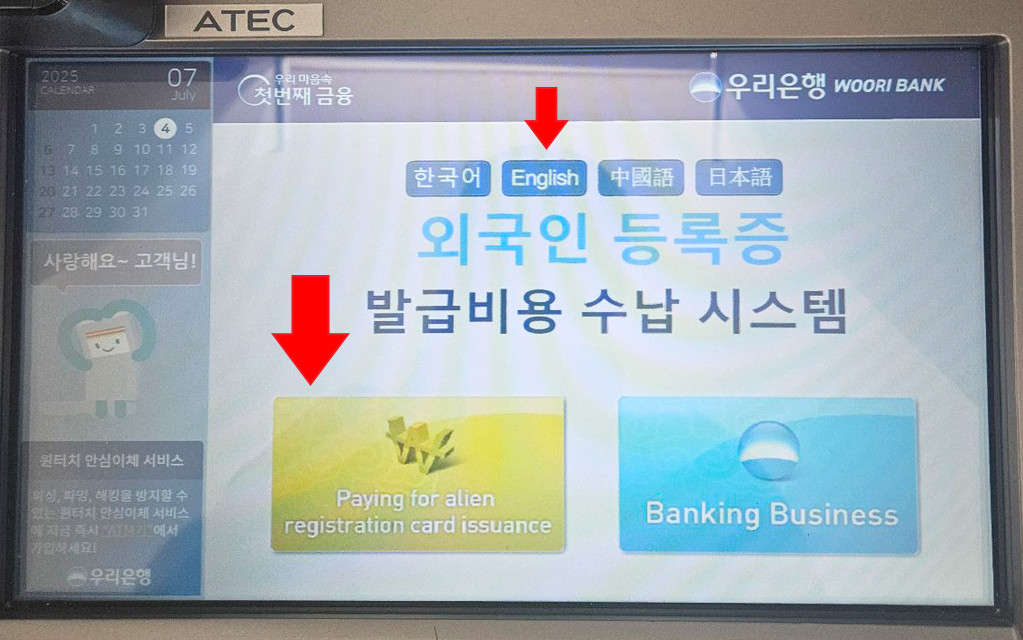
4. How to Use the ATM to Pay for the Registration Card Issuance Fee.
-
Choose English as the language.
-
Select “Paying for alien registration card issuance.”
-
Read the agreement text, and click “Agree/Continue”.
-
Choose between “Scanning your Passport” or “Directly Inputting Passport ID.” If you choose to scan your passport, turn to the passport page with your name, photo, and machine-readable zone (MRZ). Place the page face down on the scanner glass.
-
Choose between “Card Pickup” (35,000 KRW) or “Mail-in Delivery” (39,000 KRW).
-
Input the correct cash amount into the machine. Wait for the receipt.
-
Make sure to hold onto the receipt! You will have to hand in the receipt along with the rest of your documents.
| Note: There will be workers who will assist you if you need any clarification or help. |
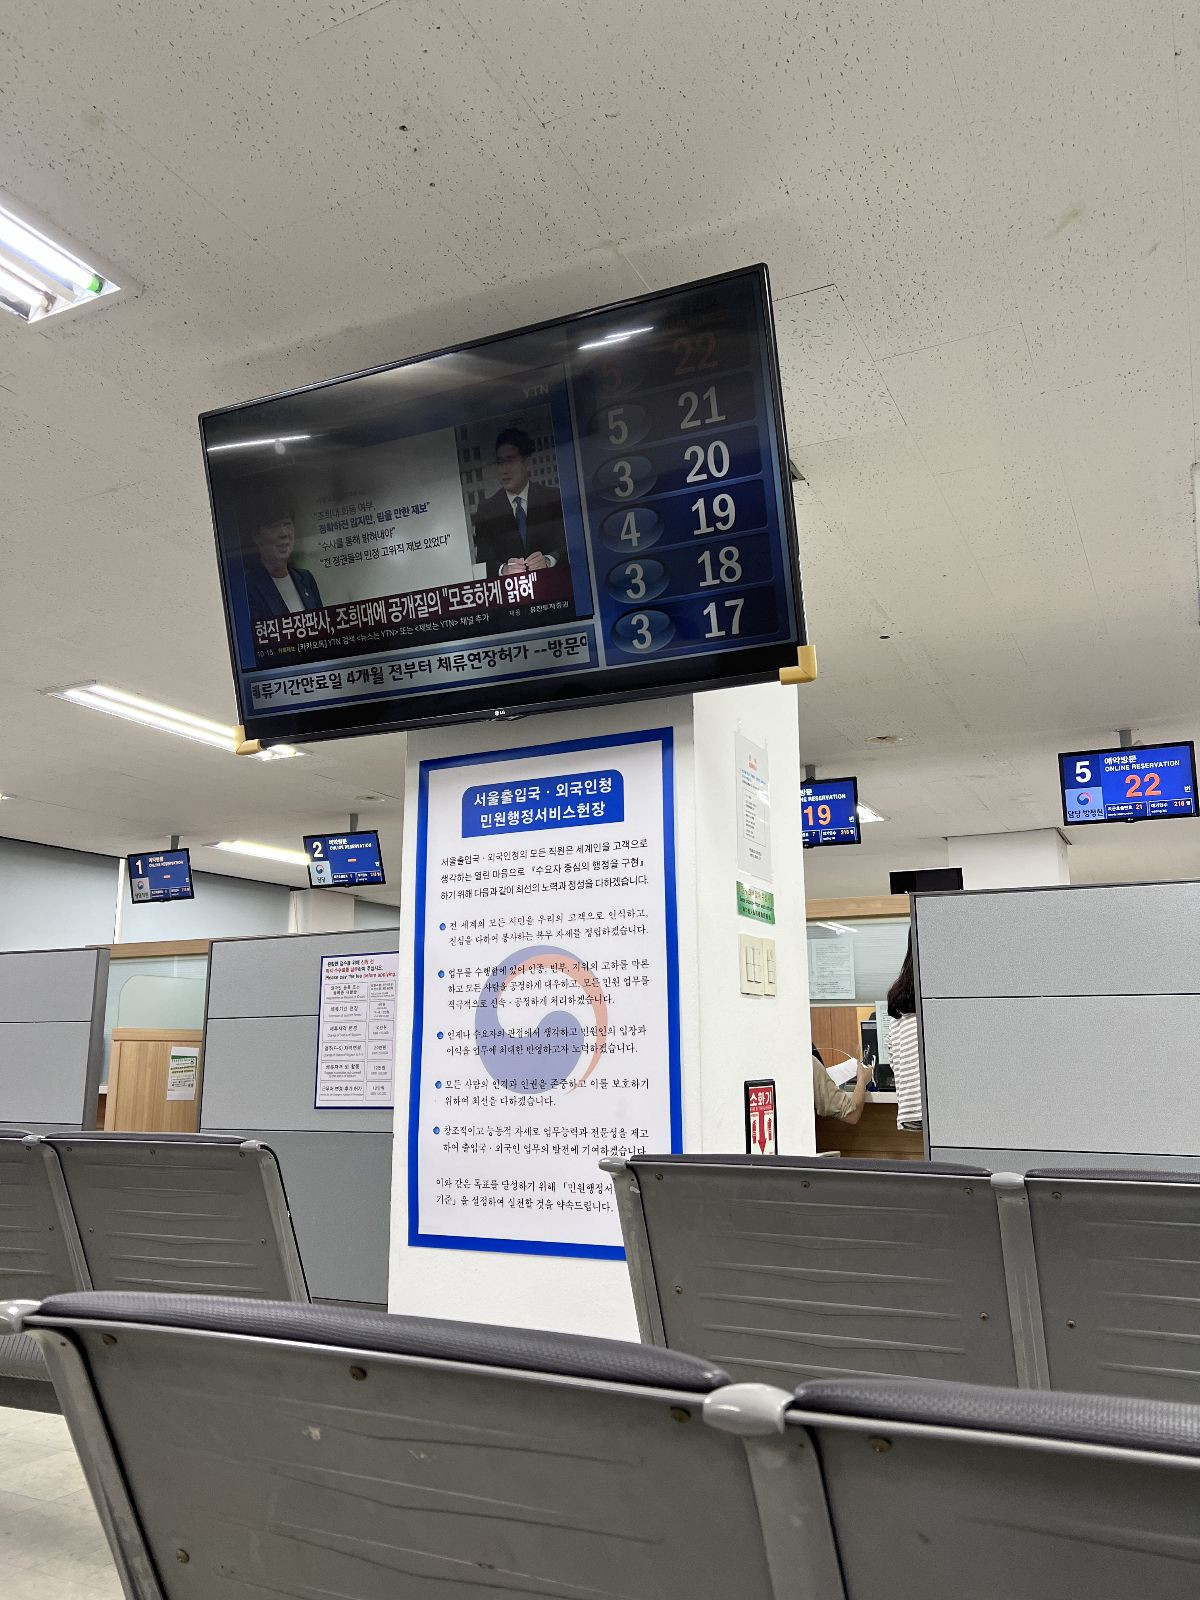
5. Remember your Call No. (E.g., 135) listed on your Appointment Receipt. Your number will appear on the TV screen and on the small monitor above the employee booth. When your number appears, you will be expected to go to the booth displaying your number.
6. Once your number is called, submit your documents and your receipt.
4. Retrieve Your Residence Card (In-Person/Mail)
You will be notified on your phone once your residence card is ready. The card typically takes 2-4 weeks to process.
- If you chose pickup, you can collect your card at the office (Information booth/Card Pick-up) without taking a queue ticket (no reservation needed)
- If you chose mail delivery, your card will be mailed to the address you provided.
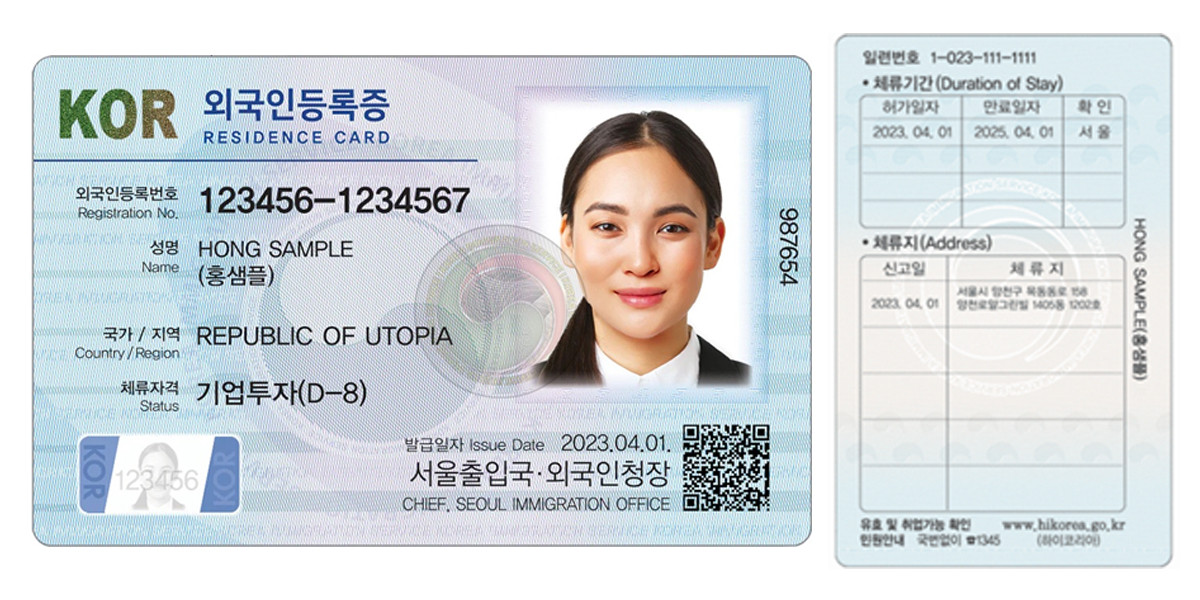
Details on your residence card
Front
- Registration No. / Alien Registration Number: 13-digit code
- Name: As shown in your passport (English)
- Nationality/Region: Written in English
- Status: (E-2-1)
- Issuing Authority: Stated in both Korean and English (Name of your Immigration Office)
Back
- Duration of Stay (1 year)
- Permission Date: Date your stay permission was granted
- Expiration Date: End date of your stay period
- Address
- Your home address in Korea
Step 5. Criminal Record Check & Report Employment to the Office of Education
Teachers working with children in Korea must obtain a Criminal Record Check conducted within Korea. This document is required when reporting employment to the Office of Education, and it must show no history of international sex offenses or child abuse.
5.1 - Criminal Record Check Process
The school will handle most of the criminal record check process. Please do not prepare your apostilled degree or background check again. If asked, you can request copies from your local immigration office in Korea by submitting a “Request for Information Disclosure.”
| Document(s) | Details |
| (1) Notarized & Apostilled Copy of Degree | • You DO NOT need to prepare apostilled documents again. • Instead, request copies from your local Korean Immigration Office by submitting a “Request for Information Disclosure.” |
| (1) Apostilled Nationwide Criminal Background | • You DO NOT need to prepare apostilled documents again. • Instead, request copies from your local Korean Immigration Office by submitting a “Request for Information Disclosure.” |
|
(1) Application Form |
• This form will be prepared by the school |
|
(1) Agreement/Consent Form |
• This form will be prepared by the school |
| (1) Original Residence Card (RC) | • Hand the Residence Card to your school |
| Original Passport | • Valid for at least 6 months (recommend 13 months) |
| (1) Standard ID Photo |
• Photo size (3 x 4cm). • Must be taken within the last 6 months • White background • No computer scans or color copies |
Criminal Record Check Procedure
| Note: Normally, the school will handle this on its own, but in rare cases, you may be asked to accompany a staff member. |
1. Visit in Person / Apply Online
Go to the local Korean police station in person to apply. The school could also apply online.
2. Document Submission
Submit your application and all required documents.
3. Certificate Issuance
Once the police complete the check, the certificate is sent back to the requesting party. It is issued immediately upon receipt. Processing can take an hour to a day. See Sample
5.2 - Report Employment to the Office of Education
Teachers must register with the local Office of Education within 15 days of their start date. Please reach out to your school or local Office of Education with any questions.
| Note: Normally, the school will handle this on its own, but in rare cases, you may be asked to accompany a staff member. |
General Required Documents for Reporting to the Office of Education
| Document(s) | Details |
| (1) Notarized & Apostilled Copy of Degree |
• You DO NOT need to prepare apostilled documents again. • Instead, request copies from your local Korean Immigration Office by submitting a “Request for Information Disclosure.” |
| (1) Apostilled Nationwide Criminal Background |
• You DO NOT need to prepare apostilled documents again. • Instead, request copies from your local Korean Immigration Office by submitting a “Request for Information Disclosure.” |
| •This form will be prepared by the school | |
|
(1) Criminal Record Check |
•This form will be prepared by the school |
| (1) Medical Examination Report |
• Must include drug test results (cocaine, opiates, cannabinoids, methoxyphenamine) • Completed within 1 month of application |
| (1) Original Residence Card or Photocopy | • Print Visa Grant Notice on “Korea Visa Portal.” |
| (1) Original Passport or Photocopy | • Valid for at least 6 months (recommend 13 months) |
| (1) Standard ID Photo |
• Photo size (3 x 4cm). • Must be taken within the last 6 months • White background • No computer scans or color copies |
Related Blog: How to Check if Your Job is Registered with the Ministry of Education (MOE)
That’s it! You’ve successfully navigated the E-2-1 visa and entry process. Now you’re all set to begin your teaching adventure in Korea.
Attachments
Share
Embark Recruiting Blogs
Embark Recruiting
As former native English teachers in Korea, we know exactly what it’s like to navigate teaching abroad. That’s why we’re committed to increasing transparency in schools and improving Korea’s ESL teaching industry. At Embark Recruiting, we provide full support to help you succeed. Our blogs offer guidance, tips, and insider knowledge for teaching in Korea.